 Let’s go over how the “Publish” area of a page works. This is an important area to control page saving, previewing, scheduling, and publishing.
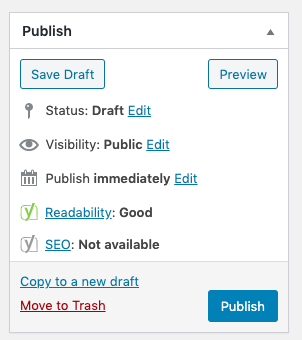
Preview
You have created a new page and are adding content with headings and styling in the editing box. Now you want to see how this looks and if you need to adjust your styling while editing the page. This where you use the “Preview” button. It will open a new browser tab, or window, to show you how it would look to a site visitor. You can go back and forth between editing and previewing until you need a break or are ready for the page to go live.
Save Draft
Use the “Save Draft” button when you need a break from editing but it is not ready to go live. Your drafts will not be published on the website. They will be saved in WordPress for you to find later.
Publish
Ready for the world to see the page? Click the “Publish” button. Now anyone with the URL can view this page and it is ready to add to your navigation for everyone to find easier.
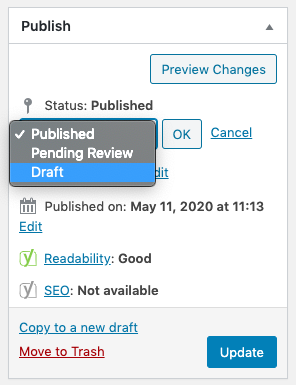
Don’t worry if you accidentally click this or want to unpublished the page. Simply go to the Status area and click “edit”. Select “draft” in the dropdown. Click “OK”. Lastly, click “Update”. It will revert it back to draft status.
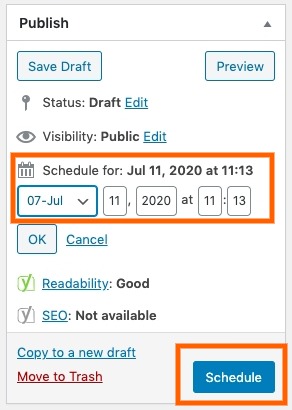
Scheduling a Page to Go Live
The little calendar option will allow you to post-date your page for publication on the site. They will remain unpublished and then later go live on the site at your preset date and time.
- Click the “edit” link after “Publish immediately”.
- Choose the date and time for the page to go live.
- Click “OK”.
- Most important, click the new “Schedule” button (this button used to be the “Publish” button). If you forget this step, the page will not go live on the dates you selected.
This feature is typically more useful for blog posts than it is static pages but is available for both.
Let us Help
If you don’t feel comfortable with the Publishing area, contact us and we will guide you through the process.