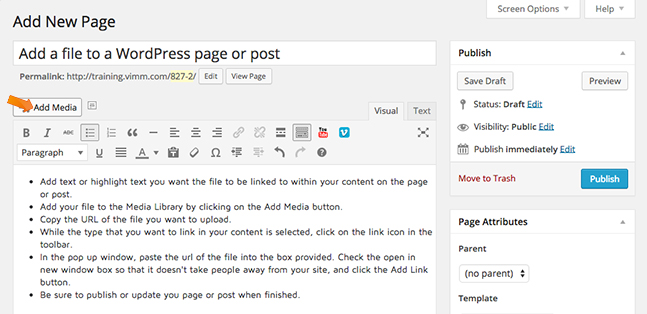
An image can be added to your page or post by uploading it from your computer or by using a previously uploaded file from your media library. When you want to add an image to your page or post, click on the “Add Media” button to open a pop up dialog box which will give you the option to upload a file or select from the media library:
Add Image From Computer
After you click “Add Media“, click the “Upload Files” tab. To add an image from your computer click on the” Select Files” button or click and drag your file from your computer into this pop-up window.
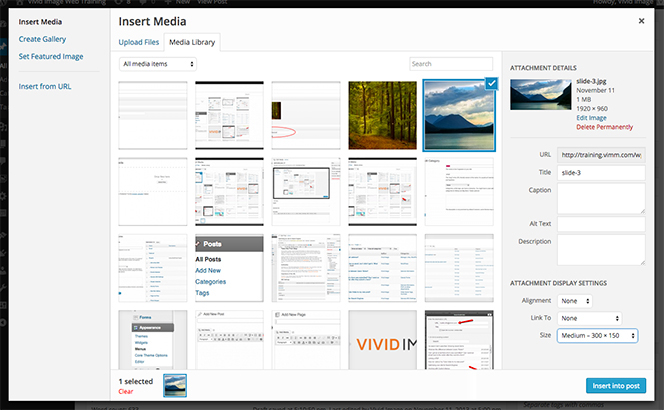
After you have uploaded your images into the system it will add it to the Media Library where you will be able to add a title, alt text and a description as well as set the size and alignment of the image on your page.
The uploader will now show you a thumbnail (a small, cropped version) of the image you uploaded. Be sure to enter in the information in the fields to the right for each image. You will want to at least enter a title for your image as well as alt text (for accessibility & SEO purposes).
- Title – A title to your image. This title is used to sort images in the media library.
- Caption – This is an optional field that will display text along with your image. It is most often contained within a box surrounding your image.
- Alt Text – Alt text or alternate text is a required field for accessibility because it explains what the image is about for those who can not see it. It is displayed inside the image container when a user’s browser is unable to locate an image or when the image can not be displayed. Search engines like Google also use alt tag as a ranking factor in their image search results which makes it very important to include a simple description of the image into the alt text field to help them understand what the image is about.
- Description – This text can be displayed on the page for your image. There is not a limit on how much you can add to the description field. Common uses could be to explain the story behind an image, how or where it was from, or even to add links associated with the image.
Alignment: The alignment setting allows you to align the image to the left of the text, in the center, or to the right. Any of these settings will force the text to wrap around the image. A setting of none will place the image on it’s own line and the text will appear above or below it, but not next to it.
Link To: If you want the image to link something when clicked on, you can click the Link To field and select from media file, attachment page, or custom URL. Select the option you want and add the URL for that file or page. You could set it to link to “Media File” if you want the image to show its original size when clicked on, or “Custom URL” if you want it to link to a different page on your site or an external site.
Size: The size of the image can also be set by choosing thumbnail, medium, large or full size. Be aware that choosing thumbnail will likely crop your image to display the center of your image, so you may the edges of your photo. The image will appear on your website very similar to the thumbnail that appears on this screen.
When you are happy with all of your image settings, click on the “Insert into Post” button. If you wish to make changes to the settings for the files in the media library without inserting any media into your page or post, simply click on the “X” in the top right and it will remember the changes you have made for the next time you access the media library.
Alternatively, if you wish to delete the file form your media library, click on the “Delete Permanently” link.
Add Image From Media Library
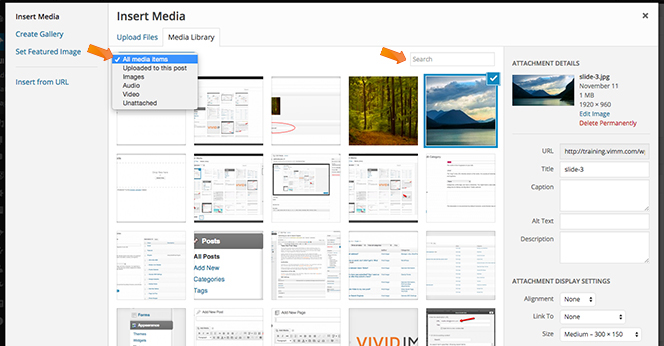 Instead of uploading a file to the media library, you can select and search from the files that are already uploaded. At the top right of the media library screen, a search bar allows you to search for specific media. At the top left your existing media files you can filter by type, (All, Uploaded to this post, Images, Audio, Video, Unattached) to help you find the image you are searching for.
The options to change the image settings are identical to the options given when you “Add Media From Computer“. When you are happy with your image settings, click on the “Insert into Post” button. If you wish to make changes to the settings for the files in the media library without inserting any media into your page or post, simply click on the “X” in the top right and it will remember the changes you have made for the next time you access the media library.
If you wish to delete that image form your media library, simply click on the “Delete permanently” link.
 Hint: The Add Media functionality is identical for adding media to a page or a post.